
Photo Organizing 101: How to Use Photomechanic to create a smart file management system
Picture this: your mom asks you to text her a photo of yourself from your childhood. You vaguely recall scanning a print, maybe even a few favorites. But when it comes to finding the actual files, you’re stumped. And the more you search, the more you feel like pulling out your hair! Digitizing analog photos or backing up digital photos seems simple enough, but organizing them so you can find them later is more challenging. Don’t worry, we’ve all been there! It’s incredibly irritating to spend hours searching for specific photo files. This is why we all need a refresher course in photo organizing 101: how to use Photo Mechanic to create a smart file management system.
As a photojournalist and college professor, I teach my students how to design a smart file management system for their photos. In my experience, a good file management system should make it simple to find any image based upon the date it was taken. To manage this workflow, I use software called Photo Mechanic. As a trusted, industry-standard tool, Photo Mechanic is stable and simple to use on a daily basis. I teach my students how to utilize Photo Mechanic to take the following steps:
- Import images from digital media like SD or CF cards
- Import images from computers or hard drives
- Add captions to images
- Make image selections before editing in Adobe Lightroom, Photoshop or Luminar (I am in the process of trying Luminar as a replacement for Photoshop).
One of the main advantages of Photo Mechanic is that it doesn’t lock you into a proprietary library that requires a specific application to access. Instead, Photo Mechanic modifies open-source metadata fields (IPTC and EXIF) within the image files themselves. This allows you to search your photos quickly and easily using any software that supports open metadata standards. As a bonus, Photo Mechanic is lightning fast. It enables you to review images much faster than waiting for an image editor like Lightroom to process hundreds or thousands of files.
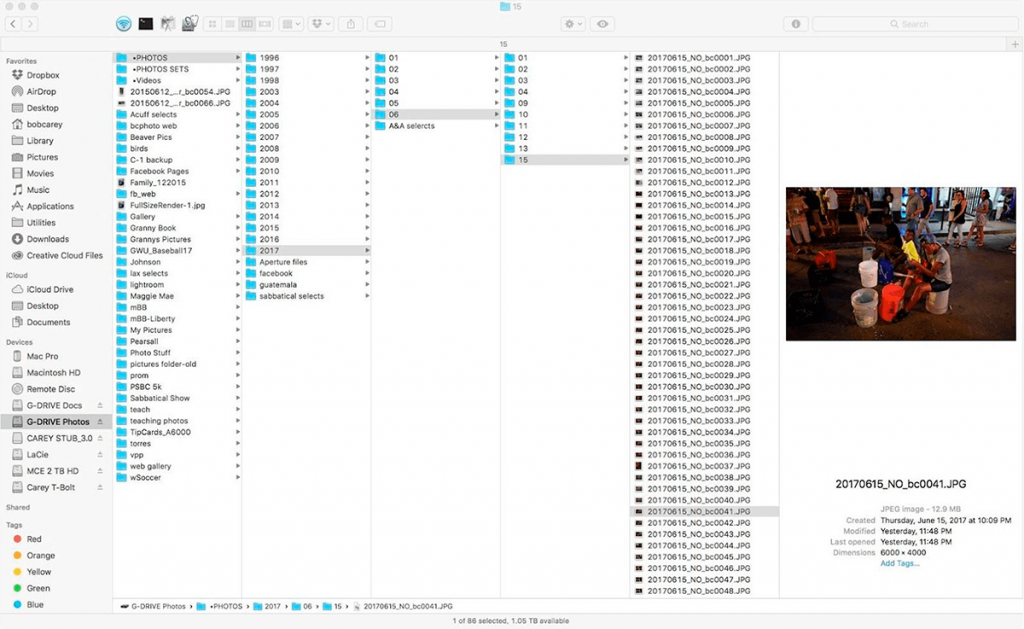
Here’s how I designed my basic file system on my hard drive:
- Create a folder for each year
- Create nested folders for each month
- Create a nested folder for each each date having a folder by month.
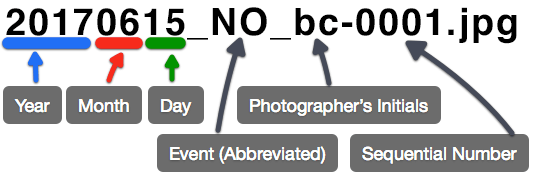
- To keep track of my images, I use YearMoDay_event_Photographer-imagenum.jpg for my filing system.
Tip – there’s no one-size-fits-all solution for file naming conventions. Your file naming system should be designed based on your specific needs. What’s most important is that you implement it consistently. Do not deviate. As outlined above, starting every file name with YearMonthDay is considered best practice. Why? Because if you sort your files alphabetically, then they will also be chronological. That makes it simple to find photos when you need them!
Let’s take a look at a real-life example. I was in New Orleans and took some photos on June 15, 2017. My naming system would be 20170615_NO_bc0001.jpg for my images. After every photo shoot, here’s the workflow I follow:
- Place SD or CF card in a card reader or in computer
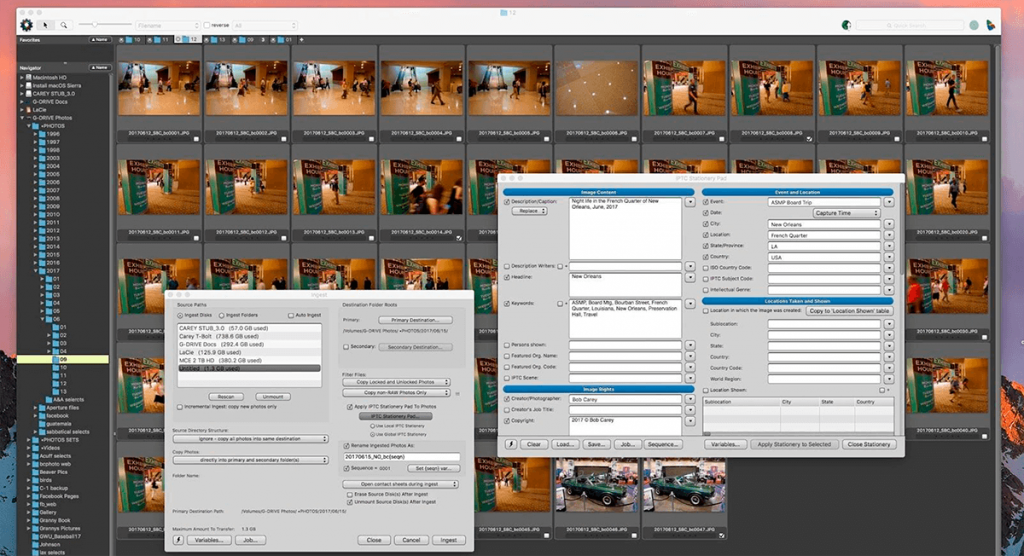
- Open Photo Mechanic and use the ingest dialog box. Or, you can set Image Capture to automatically open Photo Mechanic when an SD or CF card is inserted in your card reader. (A time-saver!)
- Choose the Destination Folder for my photos.
- Use the IPTC dialog box to enter metadata – a basic caption, keywords, location info, copyright info, etc. (See below for an illustration of adding metadata in Photo Mechanic)
5. Now I begin the import, which is fast. BTW – you can do multiple cards at the same time if you have more than one reader!
6. Photo Mechanic opens “contact sheets,” which allows you to see your images in that folder.
7. I start with the first image in contact sheet, click on the magnifying glass and quickly go through the images by using the right arrow key. Now I can start culling my photos. I personally use color-coding to rate my photos as good, better, or best. This color-coding helps me choose my favorite photos faster.
(3 = good, 2 = better, 1 = best)
- When I press the 3 key, I label an image orange. (Look for the orange bars below in the illustration.)
- When I press the 2 key, I label an image red.
- When I press the 1 key, I label an image purple.
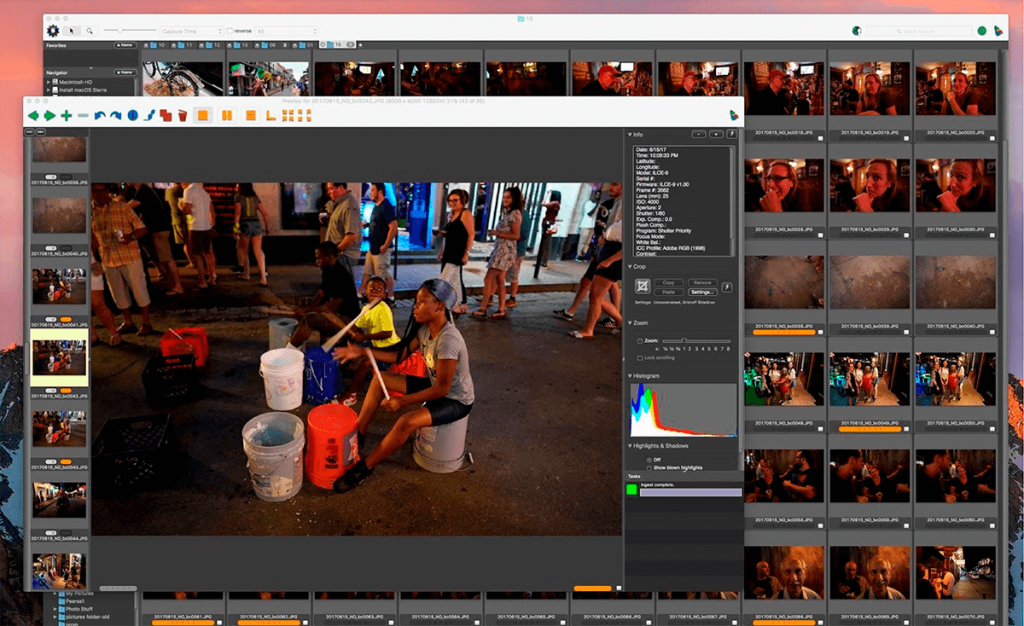
8. After my first round of culling, I can click in the bottom right corner of the window on the checkered gray button and turn off anything that isn’t color coded. I then begin a second round of culling. This time I’ll set any crop marks. When I edit the image in my image editor, the crop is applied and all of the IPTC metadata transfers. (How awesome is that?!)
9. I right click on an image to open it in Photoshop or Luminar. For Lightroom, I right click, choose “reveal” in the Finder, and then drag the folder to Lightroom and use “Add” to import them to my catalog without copying the images and bloating my hard drive with two copies of my image.
Tip – to choose which editing software you’d like to use, follow these instructions. Go to Preferences > Launching > Set. Then, scroll to the bottom of the list and choose the “Custom Editor” options to choose an application. This enables you to quickly launch your favorite image editing software from within Photo Mechanic.
Now you’re armed with the knowledge to use Photo Mechanic to create a smart file management system. And next time your mom asks you to send her a photo, you can quickly do a search in Photo Mechanic, Lightroom or even a file system to find an image! Since you’ve already added metadata and keywords in Photo Mechanic, searching will be a breeze! Although there’s an initial investment in Photo Mechanic, it is worth it because it gives you great flexibility and speed in making image selections, image editing and image retrieval. Your mom will thank you.
![]()
 About the author: Bob Carey is chair of the Department of Communication and New Media at Gardner-Webb University where he has taught photojournalism and multimedia for the past 20 years. He has worked for over 40 years as a photojournalist for newspapers, wire services and as a freelancer covering everything from Super Bowls, the Olympics, major news events around the world, down to pet of the week. He serves as a board member of the American Society of Media Photographers (ASMP), is a past president of the National Press Photographers Association (NPPA), a board member of Christians in Photojournalism (CIP), and an organizer of the Southwestern Photojournalism Conference. He did his undergraduate work in journalism at the University of Washington, received his masters in journalism from the University of Memphis and his Ph.D. from Regent University specializing in photojournalism. He and his wife Sharon have been married for 33 years and have three children. You can follow along with Bob on Instagram, Facebook, Twitter and Flickr to see his photo adventures.


4 Comments
Save Family Photos What is a Photo Organizer, and How Can They Help You Untangle Your Photo Mess and Tackle Your Family History Projects? - Save Family Photos says:
July 12, 2017 at 10:01 am
[…] Photo Organizing 101: How to Use Photomechanic to create a smart file management system […]
Greg zenitsky says:
August 3, 2017 at 2:49 pm
PROFESSOR CAREY, in the example you used regarding finding a picture of your younger self for your mother, would the search for such a photo rely totally on dates or is there some other metadata you would be searching on? Sorry for the all-caps. this comment field doesn’s seem to allow upper/lower case typing.
Rachel LaCour Niesen says:
August 9, 2017 at 2:09 pm
Hi Greg,
Thanks for the great question! When using Photomechanic, you can quickly add important metadata in addition to utilizing the file naming structure that Professor Carey outlines. The metadata you add in Photomechanic will be discoverable, because it is attached to the file itself. The best way is to add keywords within Photomechanic. Does that answer your question?
George says:
August 3, 2017 at 10:50 pm
Comment…