

10 Simple Steps to Organizing and Preserving Your Family Photo Collection
Somehow you’ve ended up with boxes of photographs, slides and piles of albums, and now you’re the family historian! You might have some old family photos that still look good, some may be ready to scan and some may need some serious restoration. Before you begin the lengthy and sometimes costly restoration process, here are 10 simple steps to organizing and preserving your family photo collection.
1. Curate and Edit Photos Select the analog photographs that are the most meaningful to you and your family. Then, create two piles – the “VIP” family photos and the duplicates or poor-quality photos.
2. Rescue Trapped Photos Remove cardboard from the backs of frames, and then replace it with acid-free board. Next, remove all photos from those messy “magnetic” albums. (Think of these as a toxic sandwich that can corrode your photos over time!) The adhesives and glues used in these albums are incredibly destructive to photographs.
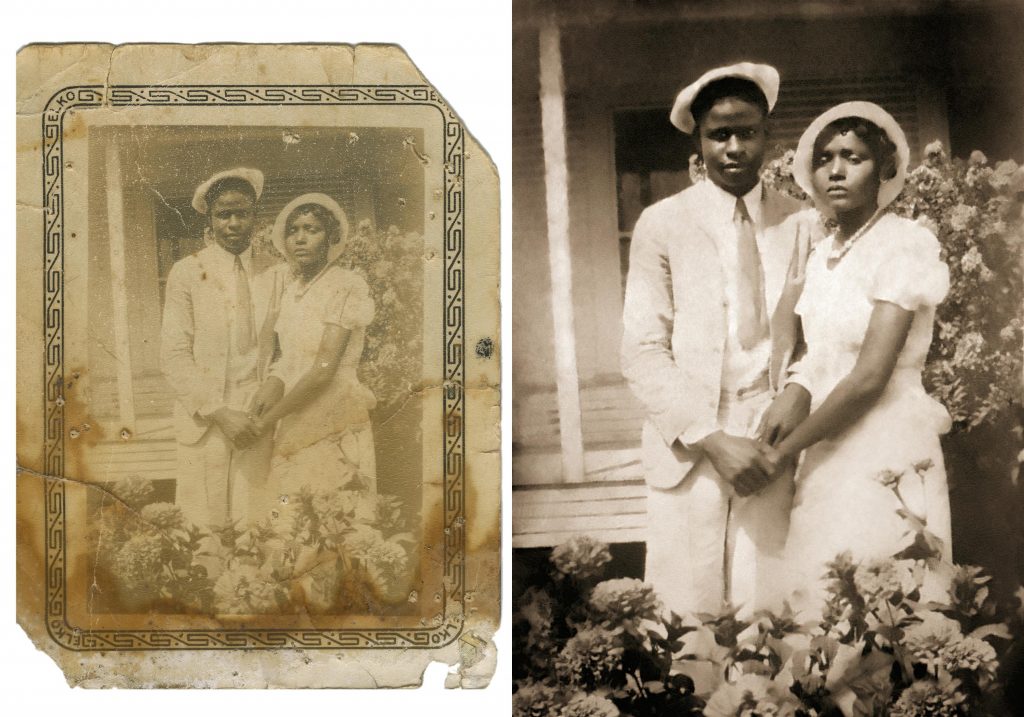
3. Restore Color Photos These photos are in the most danger because of non-permanent dyes used in the original printing process. In fact, these analog color photos will continue to fade, especially if someone doesn’t intervene to save them! If there are professional portraits with a studio logo or signature on them, always ask the professional photographer if they still have the original negatives. You’d be surprised how many professional photographers still store their negatives. If they have the original negative, you just discovered a priceless treasure! A photographic print from a good negative is always better than restoring a faded, old print.

4. Don’t Take my Kodachrome Away When working with old family slides (like those classic Kodachrome photos in Paul Simon’s song), you should scan and restore E-6, Ektachrome, Fujichrome, and Agfachrome brand films first. These types of slides fade before Kodachrome slides, which have a much longer shelf-life.
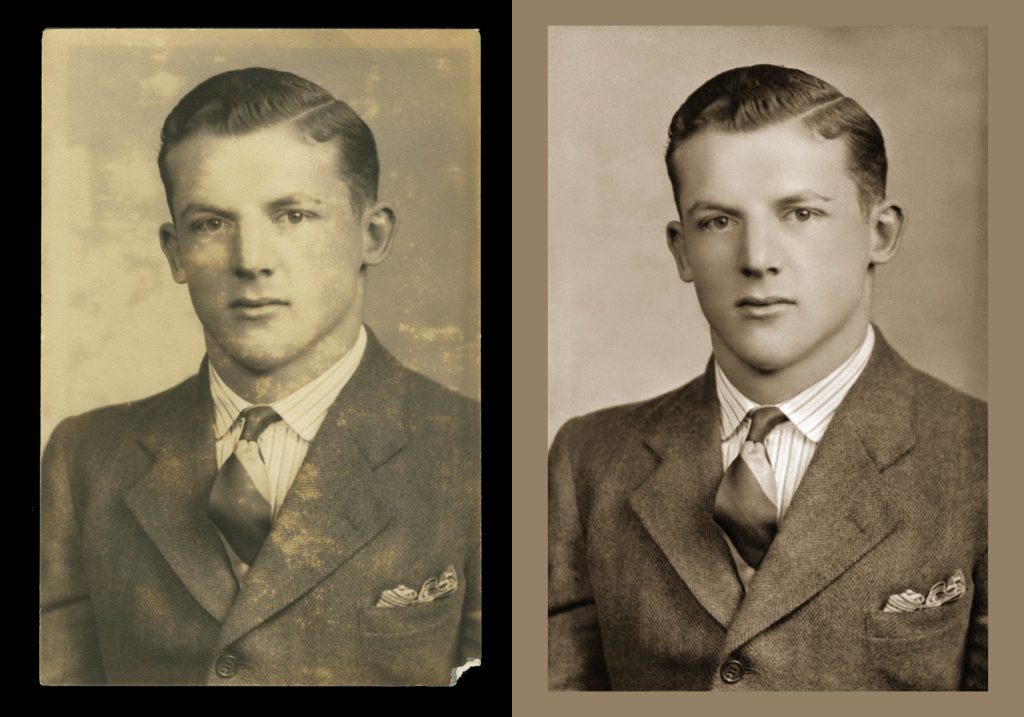
5. Save Black and White Photos Any black-and-white printed photos from the 1970s through 1980s should be restored next because they’re susceptible to degradation from being printed on RC (resin-coated) paper. Antique tintypes and daguerreotypes are actually very stable; they will last a long time. Cotton fiber prints are extemely stable, except in two cases when they should be restored. First, if the silver in the gelatin emulsion has started to oxidize, your photos may look like tarnished silverware. Or, they may have started to mold because of their organic makeup.
6. Preserve Negatives You can purchase archival “sleeves,” which are made from inert polypropylene. These sleeves are a safe way to store your negatives for future generations. “Print File” is a readily-available archival brand that you should always look for when you’re purchasing negative sleeves. Finally, store your sleeved negatives in acid-free binders or clamshell boxes to keep them dust free.
7. Protect Polaroids Although most Polaroids are very stable, there are some early versions (like Polacolor 1) that are mounted on cardboard. If you have some of these, determine which ones are salvageable and digitize (scan) them.
8. Edit Again Once you have curated and collected a first-round of your analog family photos, you should edit them a second time. Try to pare down the number of images you want to restore to include only the most important ones. Usually, the most important family photos contain loved ones or capture milestone moments from family history. Select the best pictures that singularly tell a story.
9. Restore Photos By starting the restoration process with the most valuable family photos, you ensure that you prioritize images that are important to your family history. Of course, scanning your family photos is important and makes them easy to share, but printing them on archival paper ensures their longevity. There’s just something special about high-quality, tangible prints. Digital files are temporal, but a hard copy can last for generations. Since digital files are easy to accidentally delete or corrupt, you should consider backing up your digital copies on another drive or to the cloud to protect them from losses.
10. Create a Photo Presentation After you have gone through the steps of editing, rescuing and restoring your precious family photos, create a presentation that you can share with family. Perhaps you will select an archival album with acid-free pages? Or, maybe you’ll create both a physical album and a digital slideshow? Special notes should be written on the album pages in pencil or an archival ink. Adding handwritten details of memories under the photos will create a family treasure that lasts for generations.
Photographs become our memories because they document our family history. Our team sees wonderful family photographs every day in our shop. We know how important they are, especially because so many of them are one-0f-a-kind artifacts of family legacy. We truly believe in taking time to preserve family photos. That’s why we work with families to create an heirloom that’s ready to share for years to come.
![]() About the Author: Photographique is a family owned and operated photography lab in Dallas since 1982. As a full service lab, we have always specialized in photo restoration because we know how meaningful it is. We do all of the restoration in house and handle everyone’s treasured photographs as if they were our own. You can follow along with our restoration projects on Instagram and Facebook.
About the Author: Photographique is a family owned and operated photography lab in Dallas since 1982. As a full service lab, we have always specialized in photo restoration because we know how meaningful it is. We do all of the restoration in house and handle everyone’s treasured photographs as if they were our own. You can follow along with our restoration projects on Instagram and Facebook.


No Comments